BPEL Creation with DB Adapter usage and consuming it in ADF application as webservice

Story of Project:  We are going to pass the employee id from the ADF web application to SOA BPEL, which fetches more details of an employee from the database and returns them to ADF which are then shown on the ADF page. Tool used for this project is JDev 12.1.3

This Post includes the following

  • SOA Application creation
  • DB Adapter Configuration (for connecting to Database)
  • BPEL Creation (WSDL generation)
  • ADF Application Creation
  • Consuming the WSDL and create data controls
  • Test from the ADF Application

SOA Application Cretion:

Create a SOA Application with name ‘SOA_fetchDBdataApp’

Snap2

Create a Project ‘FetchEmpDataProj’ and select the Composite With BPEL Process while project creation

Snap3

Create a BPEL with the name ‘fetchEmpDetailsBPEL’ and select Template as Synchronous BPEL Process and then click OK

Snap4

The BPEL will be created with receiveInput and replyOutput as default schema components.

Snap17

Navigate to Databases tab and create a new Database Connection with the name with which we created in console

Snap21

Now Navigate the Database Adapter to the bpel flow

Note: Before proceeding from this step you should configure your DB Adapter in the console first. Please go through the DB Adapter configuration steps given at the end of the post.

Snap22

Give the dbreference name and click on Next

Snap23

Click on Search Icon and select the created Database Connection and click on Copy Connection

Snap24

Check only Select check box as we are doing only select operation in this example and click on Next

Snap25

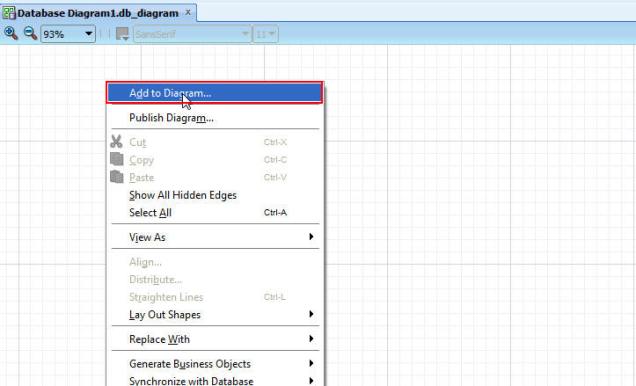
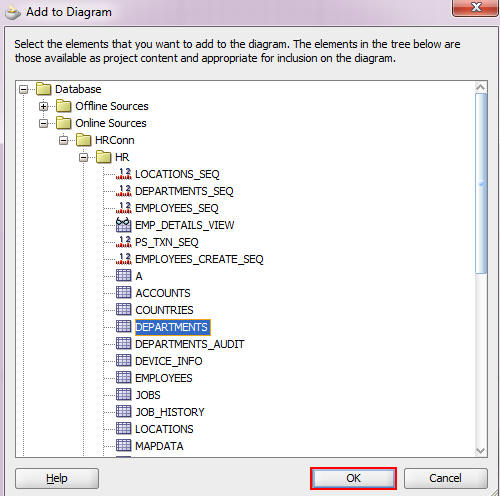
Click on Query button to select the existing table in DB and move it to the selected area by clicking on right single row.

Snap26

Now remove the unneccessary  relationships by selecting each and clicking on remove button

Snap27

Click on Add button for creating a bind variable to the query which basically used to pass a variable dynamically. Generally to apply where condition its been used

Snap28

Click on Edit button beside to query click on Add button and then Check the Parameter option and select the created parameter ’empId’ from dropdown

Snap29

You can observer the modified SQL query

Snap30

Click on Next and finally Click on Finish

Snap31

Drag and drop the Invoke BPEL Constructor below to input and map to the dbreference

Snap34

Configure the Input and Output for this DB adapter. Click on + symbol and give names to the input and output variables.

Snap36

Now drag and drop the Assign Constructor below to input

Snap37

Double click on Assign which opens a Edit Assign popup in which map the input variable value to input of database adapter and click on Apply and OK

Snap38

Now assign the output of DB Adapter to the reply output of BPEL.  For that use Assign constructor.  Here the output of DB adapter has many fields so create as many outputs in the schema also to map from DB Output to BPEL output.

Open the schema file (.xsd file) and add the the required inputs and outputs in its source view

Snap35

Now drag and drop the Assign Constructor to below to DB adapter to  map the output of DB Adapter to BPEL output.

Snap40

And then double click on it for mapping. a popup window opens where map the output of DB adapter to output variable of BPEL. Map all fields directly. There is field named ‘EmpName’ at the output section for which the input should be from two fields (firstname, lastname) so drag and drop the Expression icon to the output field ‘EmpName’

Snap41

On Drag of Expression onto field a popup opens where click on concat and then click on first name and last name. The format should be concat(val1, val2) which combines the output of these two fields  and stores in EmpName field.

Snap42

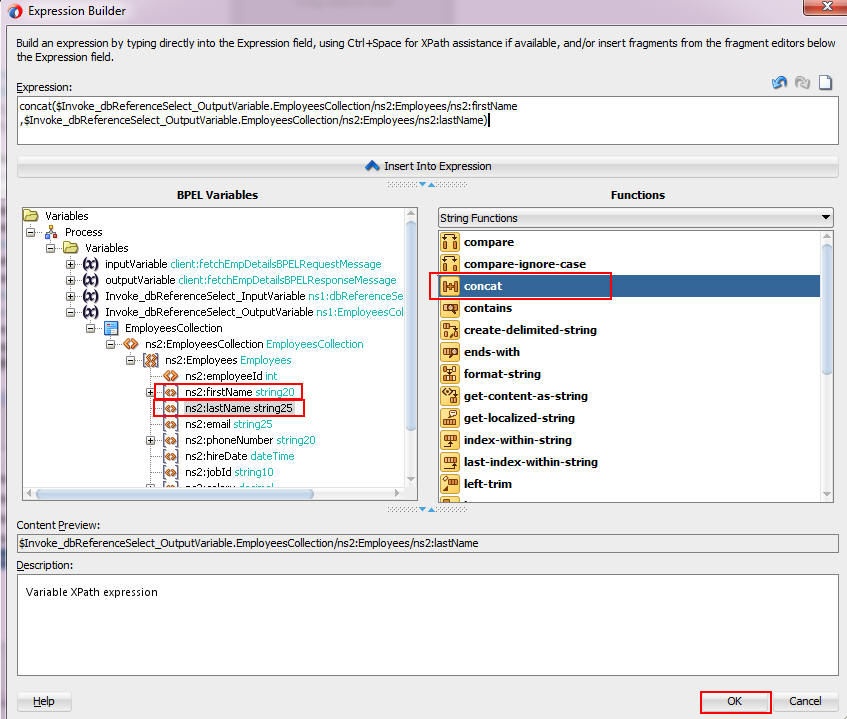
Finally click on Apply and OK

Snap43

Deployment:

Save the project and right click on project-> Deploy

Snap44

Click on Deploy to Application Server.

Check the box Overwrite any existing composites with the same revision ID. which basically useful for generating same wsdl url for every deployment. Click on Next

Snap46

Click on Integrated weblogic server. Here you can add any server and deploy to that.

Select the domain (Default Server) and click on Finish which finishes the deployment.

Snap47

Open Enterprise Manager on browser. Select the project and click on Test

Snap51

Copy the WSDL to clipboard. Give the input as 102 and click on Test Web Service

Snap52

It opens the Response tab with the result. you can Launch Flow Trace to view the complete step by step response

Snap63

ADF Application Creation:

Create ADF Fusion Web Application ‘ADF_SOA_App’ keep the default names for the project.

Snap64

Create a custom project ‘consumeEmpWS’

Snap65

Right click on the created project -> New -> Select Web Service Client and Proxy

Snap66

Paste the copied WSDL URL in the WSDL Document URL field and click on Next and proceed by keeping default settings and Finish.

Right click on the WSDL and click on Test Web Service which opens a Http Analyzer.

Snap69

Give the input and click on Send Request which returns Response at right side.

Snap70

Now right click on the WSDL file and click on Generate Data Controls which generates the data controls which can be used on in the ADF page.

Snap72

You can see the updated data Controls Section

Snap73

Now Create a jspx page under View Controller Project.

Snap74

Check the JSP XML and name it ‘getDetails.jspx’

Snap79

Go to Source code of the page and then drag and drop the web service data controls on to the center facet of the page and select the option as ADF Parameter Form.

Snap76

Now right click on the page and click on Run

Snap77

In the page pass the Employee Id and you can see the more details which are fetched through BPEL and displayed on the page.

Snap78

DB Adapter Configuration:

This includes creation of Data Source, DB Adapter Outbound Connection Creation, mapping created Outbound Connection Creation with created data source.

Open Console and Create Data Source for connecting to the database.

Snap11

Create a New Generic Data Source

Snap13

Give the connection name as ‘HRConn’ and JNDI name as ‘jdbc/HRConnDS’ for the data source

Snap14

Give the Database Connection details and click on Next

Snap15

Click on Test Configuration which shows a success message for the successful connection. Click on Finish.

Snap16

Click on DbAdapter from the deployments

Snap5

Click on Configuration -> Outbound Connection pools -> New and then create an outbound connection

Snap7

Click on Next

Snap8

Give the JNDI name for the Outbound connection as eis/DB/HRConn

Snap20

Click on the Created Outbound Connection Pool

Snap9

Give the property  value for XA Data Source name as with earlier created DataSource jndi name ‘jdbc/HRConnDS’ and click on save

Snap61

Now again go to deployments and select DbAdapter and click on update which ends the DB Adapter Configuration.

Snap62

Database Modeling in JDeveloper

In this post am gonna discuss about online and offline database modelling.

well database modelling means managing/modifying the database objects (tables, views, etc).

Online Database Modelling: For doing this generally we create a Database diagram to visualize, create, or inspect tables, views, synonyms, or sequences. After creating the database diagram we can add the database objects to it and then we can edit them, which will directly reflect in the database. No need to execute any commands to do changes in database, we can do the changes that we want.. in the database diagram only. which provides UI to do many operations (rename, data type changes, size changes etc).

Offline Database Modelling: This is similar to online database modelling but the only difference is the changes won’t reflect in the database until we synchronize the changes we made with the current object in the database. well this is very useful as we can do the modelling as like we want and modify at any time before synchronizing with the database.

Lets discuss each of them in detail below

In detail – Online Database Modelling :

Am gonna explain it with an example.

1) Create a Fusion Web Application (ADF ) or Generic Application

2) Create a project

3) Create a database diagram under the project

Snap1

4) Create a New Database Connection

Snap2

5)  Connect to the HR Schema

Snap4

6) Right click on the database diagram that we created and select Add to Diagram and then select the required database object on which you wanted to do the changes.

Snap6

Snap7

7)  You can directly open the Database Navigator and then drag and drop the required objects to the diagram. while dragging to the diagram select the Leave objects the in the Database Connection check box

Snap8

Snap5

8)  Similarly you can do it for other db objects (Employees table) also. After adding the required DB objects to the diagram optimize the height and width of the objects to get a clear view. To do this select a DB Object, right click on it -> Optimize Shape Size -> Height and Width

Snap9

Snap10

9) You can change the header color of an object from the Inspect Element to get a clear view when there are more objects in the diagram. (you can also use different colors for views, tables to differentiate them clearly)

Snap11

10)  Now lets start modelling the database objects. Select a DB object Departments and double click on it which opens a popup.

Snap12

11) Change the Size of the Department_name column from 30 to 38 and click on ok

Snap13

12) The change we made here will reflect in the database, so this procedure is called Online database modelling. To check the changes in the database select Tools -> Database -> SQL Worksheet -> Select the created Connection name.

Snap14

13) Execute the command desc departments;  and observe the size of the department_name column which is changed to 38.

Snap15

14) Similarly you can rename the table, change the properties of the column etc..

In detail – Offline Database Modelling :

1) Create a project and then drag and drop the DB Objects (Departments, Employees) to the diagram.  Select the Copy Objects to Project and click on OK

Snap18

2) You can observe the structure of the project now…which creates a folder and keeps the selected DB objects under it.

Snap19

3) After adding the required DB objects to the diagram optimize the height and width of the objects to get a clear view. To do this select a DB Object, right click on it -> Optimize Shape Size -> Height and Width

Snap9

Snap10

4) You can change the header color of an object from the Inspect Element to get a clear view when there are more objects in the diagram. (you can also use different colors for views, tables to differentiate them clearly)

Snap11

5) Now lets start modelling the database objects offline. Select a DB object Departments and double click on it which opens a popup.

Snap12

6) Change the Size of the Department_name column from 45 and click on ok

Snap20

7) The change we made here won’t reflect in the database as we are doing it offline. To check the changes in the database select Tools -> Database -> SQL Worksheet -> Select the created Connection name.

Snap14

8) Execute the command desc departments;  and observe the size of the department_name column which is  still showing old value…not changed to the new value 45.

Snap155

9) In order to reflect the changes  in the database that we  made in diagram, we have to synchronize the changes with DB object. Select the required DB object in the diagram right click and select Synchronize with Database -> Generate To -> SQL script which opens a popup with few radio buttons to select what type of query to generate which is explained below.

Create: On selection of this option tool provides the queries to create the current DB Object with the changes we made

Replace: On selection of this option tool provides sql commands to delete the current DB object and also to create it again with the changes we made

Alter:  On selection of this option tool provides sql commands to alter the changes we made to the existing DB object.

10) Select the Alter check box and check the Manual Reconcile option under ALTER check box which helps us to view what changes we made and show the differences between diagram DB object and Database DB object which helps us to cross verify before updating changes to database.

Snap25

11) In the next screen you can see the changes we made to the DB Objects.

Snap26

12) Click on the top right image to view the only differences between DB objects

Snap27

13) After verifying the changes go Back and un check Manual Reconcile and click Next and FinishSnap28

14) Now you can see the generated alter sql command. Execute it to reflect the changes in the database

Snap29

This is how Offline and Online database modelling works.

15) while working with offline db objects at any point of time you can get the latest DB object from the database by simply right clicking on DB object -> Synchronize with Database -> Select Refresh from DB connection name.

Snap30

Let’s discuss about creating a new database object (new table) offline and then Reconcile with the database

Creating New Database objects:

1) Open component palette and drag n drop the table to the database diagram

Snap32

2) Give the table name and create columns by specifying their names and datatypes. double click on the fields allows to create a new column.

Snap33

3)Double click on the column to make it as primary key or to set as not null, which opens a popup. Select the Primary Key in the side menu and move the required column to selected section to make it as primary key.

Snap34

4) After setting a column as primary key a record will be displayed in key relationship section of the DB object in the diagram

Snap36

5) Now Synchronize with the database. Right click and select synchronize with database -> Generate to-> SQL Script which opens a popup -> select Create check box -> Next -> FinishSnap37

6) Click on Finish generates an SQL query for creating the table in database

Snap38

7) Execute the query in by connecting to the database which creates a table in the database.

In this post till now we discussed about

  • Database modelling
  • Creating a schema model (adding existing schema objects to the database diagram)
  • Modify the schema model
  • Reconcile the modifications to the database (save to database)
  • Import database object definitions to an offline database
  • Reconcile the offline database objects with the database (save to database)
  • Creating New offline database objects and Reconcile with the database

Managing Users in Web Logic Server Programatically

This Post describes about how to manage the users in weblogic server programatically.

A sample WebCenter Portal Application is created in that a page has been created for managing the users (creating) and a java class has been created which basically performs the required operations that we do from front end.

Steps to Create the Users Progrmatically:

1) Create the WebCenter Portal Framework Application

Snap1

2) Create a java class which basically contains all the code to manage the users in weblogic server

Snap2

Code for the customCreateUser class:


package portalbeans;

import java.util.logging.Level;

import javax.faces.event.ActionEvent;

import oracle.security.idm.UserProfile;
import oracle.security.idm.IdentityStore;
import oracle.security.idm.UserManager;
import oracle.security.idm.PropertySet;
import oracle.security.idm.Property;

import oracle.webcenter.security.common.WCSecurityUtility;

import oracle.adf.share.logging.ADFLogger;
import oracle.adf.view.rich.component.rich.input.RichInputText;

public class customCreateUser {
String firstname;
String lastname;
String mailId;
String loginName;
String password;
String phNumber;
String address;
// Initialize ADF Logger
private static ADFLogger adfLogger =
ADFLogger.createADFLogger(customCreateUser.class);

private static String CLASS_NAME = "customCreateUser";

/**
* Creates user with the given attributes.
*
* @param firstName
* @param lastName
* @param mailId
* @param loginName
* @param password
*/

public void runMehod(ActionEvent actionEvent) {
//createUser("Raviteja", "Yellina", "emailId@weblogic.com",
// "ravi", "welcome123", "123708459", "bangalore");

createUser(firstname,lastname, mailId,loginName, password, phNumber, address);
}
public static void createUser(String firstName, String lastName,
String mailId, String loginName,
String password, String phoneNum,
String address) {
try {
System.out.println("try");
// Get the default identity store
IdentityStore idStore =
WCSecurityUtility.getDefaultIdentityStore();

// Get the user manager object
UserManager um = idStore.getUserManager();
System.out.println("got user mgr");

// Create a property for the extra attributes
PropertySet ps = new PropertySet();

ps.put(new Property(UserProfile.FIRST_NAME, firstName));
System.out.println("FIRST_NAME:" + firstName);

ps.put(new Property(UserProfile.LAST_NAME, lastName));
System.out.println("LAST_NAME:" + lastName);

ps.put(new Property(UserProfile.BUSINESS_EMAIL, mailId));
System.out.println("BUSINESS_EMAIL:" + mailId);

ps.put(new Property(UserProfile.USER_NAME, loginName));
System.out.println("USER_NAME:" + loginName);

ps.put(new Property(UserProfile.DISPLAY_NAME,
firstName + " " + lastName));
System.out.println("DISPLAY_NAME:" + firstName + " " + lastName);

ps.put(new Property(UserProfile.HOME_PHONE, phoneNum));
System.out.println("HOME_PHONE:" + phoneNum);

ps.put(new Property(UserProfile.HOME_ADDRESS, address));
System.out.println("HOME_ADDRESS:" + address);

// to create it in weblogic server
// Call the create user api with loginame, password and extra properties
um.createUser(loginName, password.toCharArray(), ps);
System.out.println("created user");
} catch (Exception e) {
if (adfLogger.isWarning()) {
adfLogger.logp(Level.WARNING, "createUser", CLASS_NAME,
"Could not create user");
adfLogger.warning(e);
}
}
}
public void setFirstname(String firstname) {
this.firstname = firstname;
}

public String getFirstname() {
return firstname;
}

public void setLastname(String lastname) {
this.lastname = lastname;
}

public String getLastname() {
return lastname;
}

public void setMailId(String mailId) {
this.mailId = mailId;
}

public String getMailId() {
return mailId;
}

public void setLoginName(String loginName) {
this.loginName = loginName;
}

public String getLoginName() {
return loginName;
}

public void setPassword(String password) {
this.password = password;
}

public String getPassword() {
return password;
}

public void setPhNumber(String phNumber) {
this.phNumber = phNumber;
}

public String getPhNumber() {
return phNumber;
}

public void setAddress(String address) {
this.address = address;
}

public String getAddress() {
return address;
}
}

3) Create a jspx page for creating the users from front end

Snap5

Code for the page  manageUsers.jspx


<?xml version='1.0' encoding='UTF-8'?>
<jsp:root xmlns:jsp="http://java.sun.com/JSP/Page" version="2.1"
xmlns:f="http://java.sun.com/jsf/core"
xmlns:h="http://java.sun.com/jsf/html"
xmlns:af="http://xmlns.oracle.com/adf/faces/rich">
<jsp:directive.page contentType="text/html;charset=UTF-8"/>
<f:view>
<af:document id="d1" inlineStyle="background:#efefef">
<af:form id="f1">
<af:panelGroupLayout id="pgl1" layout="vertical" inlineStyle="background:#fff;padding:100px 200px;;">
<af:outputText value="User Creation:" inlineStyle="font-size:18px;"
id="ot1"/>
<af:spacer height="10px" id="s1"/>
<af:panelFormLayout labelAlignment="top">
<af:inputText label="First Name" contentStyle="font-size:14px;" inlineStyle="padding:8px 0px;font-size:16px;"
value="#{customCreateUser.firstname}" id="it1"/>
<af:inputText label="Last Name" contentStyle="font-size:14px;" inlineStyle="padding:8px 0px;font-size:16px;"
value="#{customCreateUser.lastname}" id="it2"/>
<af:inputText label="Email Id" contentStyle="font-size:14px;" inlineStyle="padding:8px 0px;font-size:16px;"
value="#{customCreateUser.mailId}" id="it3"/>
<af:inputText label="Address" contentStyle="font-size:14px;" inlineStyle="padding:8px 0px;font-size:16px;"
value="#{customCreateUser.address}" id="it4"/>
<af:inputText label="Phone Number" contentStyle="font-size:14px;" inlineStyle="padding:8px 0px;font-size:16px;"
value="#{customCreateUser.phNumber}" id="it5"/>
<af:inputText label="Login Name" contentStyle="font-size:14px;" inlineStyle="padding:8px 0px;font-size:16px;"
value="#{customCreateUser.loginName}" id="it6"/>
<af:inputText label="Password" contentStyle="font-size:14px;" inlineStyle="padding:8px 0px;font-size:16px;"
value="#{customCreateUser.password}" id="it7" secret="true" />
<af:commandButton text="Create User" id="cb1" inlineStyle="padding:5px 10px;margin:10px 0px 0px -5px"
actionListener="#{customCreateUser.runMehod}"/>
</af:panelFormLayout>
</af:panelGroupLayout>
</af:form>
</af:document>
</f:view>
</jsp:root><strong>
</strong>

4)  Run the page and fill all the fields present in the page and click on button Create User

Snap8

5) The user will be created successfully in the weblogic server. You can check the user details in the following location: Home -> Security Realms -> myrealm -> Users and groupsSnap9

6) Click on the user and in the attributes section you can see attribute values which you gave in the front end page

Snap10