In this post am gonna discuss about online and offline database modelling.
well database modelling means managing/modifying the database objects (tables, views, etc).
Online Database Modelling: For doing this generally we create a Database diagram to visualize, create, or inspect tables, views, synonyms, or sequences. After creating the database diagram we can add the database objects to it and then we can edit them, which will directly reflect in the database. No need to execute any commands to do changes in database, we can do the changes that we want.. in the database diagram only. which provides UI to do many operations (rename, data type changes, size changes etc).
Offline Database Modelling: This is similar to online database modelling but the only difference is the changes won’t reflect in the database until we synchronize the changes we made with the current object in the database. well this is very useful as we can do the modelling as like we want and modify at any time before synchronizing with the database.
Lets discuss each of them in detail below
In detail – Online Database Modelling :
Am gonna explain it with an example.
1) Create a Fusion Web Application (ADF ) or Generic Application
2) Create a project
3) Create a database diagram under the project

4) Create a New Database Connection

5) Connect to the HR Schema

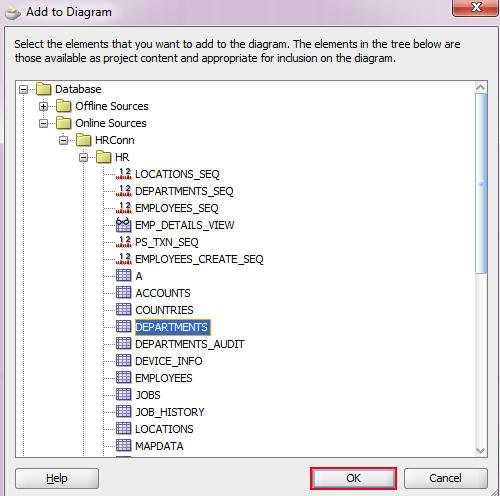
6) Right click on the database diagram that we created and select Add to Diagram and then select the required database object on which you wanted to do the changes.

7) You can directly open the Database Navigator and then drag and drop the required objects to the diagram. while dragging to the diagram select the Leave objects the in the Database Connection check box


8) Similarly you can do it for other db objects (Employees table) also. After adding the required DB objects to the diagram optimize the height and width of the objects to get a clear view. To do this select a DB Object, right click on it -> Optimize Shape Size -> Height and Width


9) You can change the header color of an object from the Inspect Element to get a clear view when there are more objects in the diagram. (you can also use different colors for views, tables to differentiate them clearly)

10) Now lets start modelling the database objects. Select a DB object Departments and double click on it which opens a popup.

11) Change the Size of the Department_name column from 30 to 38 and click on ok

12) The change we made here will reflect in the database, so this procedure is called Online database modelling. To check the changes in the database select Tools -> Database -> SQL Worksheet -> Select the created Connection name.

13) Execute the command desc departments; and observe the size of the department_name column which is changed to 38.

14) Similarly you can rename the table, change the properties of the column etc..
In detail – Offline Database Modelling :
1) Create a project and then drag and drop the DB Objects (Departments, Employees) to the diagram. Select the Copy Objects to Project and click on OK

2) You can observe the structure of the project now…which creates a folder and keeps the selected DB objects under it.

3) After adding the required DB objects to the diagram optimize the height and width of the objects to get a clear view. To do this select a DB Object, right click on it -> Optimize Shape Size -> Height and Width
4) You can change the header color of an object from the Inspect Element to get a clear view when there are more objects in the diagram. (you can also use different colors for views, tables to differentiate them clearly)
5) Now lets start modelling the database objects offline. Select a DB object Departments and double click on it which opens a popup.
6) Change the Size of the Department_name column from 45 and click on ok

7) The change we made here won’t reflect in the database as we are doing it offline. To check the changes in the database select Tools -> Database -> SQL Worksheet -> Select the created Connection name.
8) Execute the command desc departments; and observe the size of the department_name column which is still showing old value…not changed to the new value 45.

9) In order to reflect the changes in the database that we made in diagram, we have to synchronize the changes with DB object. Select the required DB object in the diagram right click and select Synchronize with Database -> Generate To -> SQL script which opens a popup with few radio buttons to select what type of query to generate which is explained below.
Create: On selection of this option tool provides the queries to create the current DB Object with the changes we made
Replace: On selection of this option tool provides sql commands to delete the current DB object and also to create it again with the changes we made
Alter: On selection of this option tool provides sql commands to alter the changes we made to the existing DB object.
10) Select the Alter check box and check the Manual Reconcile option under ALTER check box which helps us to view what changes we made and show the differences between diagram DB object and Database DB object which helps us to cross verify before updating changes to database.

11) In the next screen you can see the changes we made to the DB Objects.

12) Click on the top right image to view the only differences between DB objects

13) After verifying the changes go Back and un check Manual Reconcile and click Next and Finish
14) Now you can see the generated alter sql command. Execute it to reflect the changes in the database

This is how Offline and Online database modelling works.
15) while working with offline db objects at any point of time you can get the latest DB object from the database by simply right clicking on DB object -> Synchronize with Database -> Select Refresh from DB connection name.

Let’s discuss about creating a new database object (new table) offline and then Reconcile with the database
Creating New Database objects:
1) Open component palette and drag n drop the table to the database diagram

2) Give the table name and create columns by specifying their names and datatypes. double click on the fields allows to create a new column.

3)Double click on the column to make it as primary key or to set as not null, which opens a popup. Select the Primary Key in the side menu and move the required column to selected section to make it as primary key.

4) After setting a column as primary key a record will be displayed in key relationship section of the DB object in the diagram

5) Now Synchronize with the database. Right click and select synchronize with database -> Generate to-> SQL Script which opens a popup -> select Create check box -> Next -> Finish
6) Click on Finish generates an SQL query for creating the table in database

7) Execute the query in by connecting to the database which creates a table in the database.
In this post till now we discussed about
- Database modelling
- Creating a schema model (adding existing schema objects to the database diagram)
- Modify the schema model
- Reconcile the modifications to the database (save to database)
- Import database object definitions to an offline database
- Reconcile the offline database objects with the database (save to database)
- Creating New offline database objects and Reconcile with the database