Showing Parameters passed in the URL in a page – Oracle ADF

In ADF Application we can read the parameters passed in the URL and display them as an output text using a simple EL (Expression language).

#{param.paramName}

Sample Jspx page:

1

Page in browser:

2If your requirement is to show the URL passed in parameter data in the input text field and if there is no parameter data passed then show it as an input text field, then you can use below given EL which is having the ternary condition.

<af:inputText value=”#{param.dept eq null? bindings.DepartmentId.inputValue: param.dept}” />

Browser output when URL: 

http://127.0.0.1:7101/Application2-ViewController-context-root/faces/home.jspx

3.PNG

Browser output when URL: 

http://127.0.0.1:7101/Application2-ViewController-context-root/faces/home.jspx?dept=Marketing

4.PNG


This post is intended to show how the requirement can be fulfilled with the help of EL.

Invoke a WebService with the Inserted Rows data of Excel sheet in ADF-DI:

In ADF-DI you don’t have any direct option available to get the control over all the inserted rows to invoke WS (Web Service). So you must implement it with the help of programmatic approach.

First what you need to understand is, If you want to upload 100 records of data from Excel sheet to DB, first you must set a property [InsertBeforeRowActionID : ‘CreateInsert‘] which means before reading each row of data, a new empty row object is created and the data of that row is stored into that row object cache. The same thing happens for all the rows. Once all the rows of Excel sheet are read, the cached data has to be committed to DB. So set the property [CommitBatchActionID: Commit] which inserts the cached data to DB.

The above properties must be set to upload data to DB from Excel sheet. To achieve this your page definition file must contain the bindings [tree binding, Commit, CreateInsert bindings]

To get the Handle over the Excel sheet data, you must set below proprieties.
Property [InsertBeforeRowActionID : ‘eachRowInvokeAM‘] which is being used to Invoke a custom method where current row data can be read and stored to a List. This will repeat for all the rows.
Then set the property [SuccessActionID : afterAllRowsInvokeAM] for a ribbon command ‘Update‘. This triggers the custom method ‘afterAllRowsInvokeAM’ after successful Insert/Update to DB. In this custom method, you can work with the list which has the data of all rows inserted in the Update operation. Using this data you can Invoke a Web Service.

You must write your custom methods in AMImpl class. ADF12c supports only AMImpl class methods, where as ADF11g supports AMImpl & VOImpl class methods to invoke.

Eg: Let’s take an example, where we insert a record to Departments table. And after all the rows got inserted to DB from ADF-DI Excel sheet a webservice should be invoked with the inserted data as input. For this set the below properties.

InsertBeforeRowActionID : ‘CreateInsert’
InsertBeforeRowActionID : ‘eachRowInvokeAM’
InsertRowEnabled: True
CommitBatchActionID: Commit
RibbonCommand- Update -> SelectActionSet -> ActionOptions -> SuccessActionID : afterAllRowsInvokeAM

Custom methods given above are [‘eachRowInvokeAM’, ‘afterAllRowsInvokeAM’] are mehtods created in AMImpl class .
Another class also created ‘Dept’ which is a Pojo class with the column names as variables and having parameterized constructor.
In the AMImpl class, a list is created of type ‘Dept’ pojo class. And the parameterized constructor is being invoked to insert the department type object to the list. Two custom methods are created in it [‘eachRowInvokeAM’, ‘afterAllRowsInvokeAM’] and are exposed and then added to the page definition file as method bindings. During each row insert ‘eachRowInvokeAM’ will be invoked and that row data in inserted to the List. Once the commit operation is susccessful another method ‘afterAllRowsInvokeAM’ will be invoked where the list data is read and used as input to Invoke the webservice.

The page definition file should be:

ADF-DI_1.PNG

Excel properties should be:

ADF-DI_3

ADF-DI_2


AmImpl.java:


package model;

import java.io.BufferedReader;
import java.io.InputStream;
import java.io.InputStreamReader;
import java.io.OutputStream;
import java.io.OutputStreamWriter;

import java.net.HttpURLConnection;
import java.net.URL;

import java.util.ArrayList;
import java.util.List;

import model.common.AppModule;

import oracle.jbo.Row;
import oracle.jbo.server.ApplicationModuleImpl;
import oracle.jbo.server.ViewLinkImpl;
import oracle.jbo.server.ViewObjectImpl;

public class AppModuleImpl extends ApplicationModuleImpl implements AppModule {

/* Custom Code */
List dept = new ArrayList();
public void eachRowInvokeAM(){
System.out.println("Entered before Upload..");
System.out.println("row count:"+getDepartmentsView1().getRowCount());
Row r = getDepartmentsView1().getCurrentRow();
System.out.println(r.getAttribute("DepartmentId"));
System.out.println(r.getAttribute("DepartmentName"));
System.out.println(r.getAttribute("LocationId"));
System.out.println(r.getAttribute("ManagerId"));

int deptId = Integer.valueOf(r.getAttribute("DepartmentId").toString());
String deptName = r.getAttribute("DepartmentName").toString();
int locId = Integer.valueOf(r.getAttribute("LocationId").toString());
int mgrId = Integer.valueOf(r.getAttribute("ManagerId").toString());

//adding current row to list
dept.add(new Dept(deptId, deptName, locId, mgrId));
}

public void afterAllRowsInvokeAM() {
System.out.println("after Insert success..");
System.out.println("rows inserted:"+dept.size());
for(int i=0; i< dept.size(); i++){
System.out.println(dept.get(i).getDepartmentId());
System.out.println(dept.get(i).getDepartmentName());
System.out.println(dept.get(i).getLocationId());
System.out.println(dept.get(i).getManagerId());
}
System.out.println("Now Invoking WebService");
try {
http_client();  // Invoke Webserive method
} catch (Exception e) {
}
}

public static void http_client() throws Exception {
System.out.println("Invoke service using direct HTTP call with Basic Auth");
String payload =
"\n" +
" \n" +
" \n" +
" \n" +
" INR\n" +
" USD\n" +
" \n" +
" \n" +
"";

httpPost("http://www.webservicex.net/CurrencyConvertor.asmx" + "?invoke=", payload);
}
private static String httpPost(String destUrl, String postData) throws Exception {
URL url = new URL(destUrl);
HttpURLConnection conn = (HttpURLConnection)url.openConnection();
if (conn == null) {
return null;
}
conn.setRequestProperty("Content-Type", "text/xml; charset=UTF-8");
conn.setDoOutput(true);
conn.setDoInput(true);
conn.setUseCaches(false);
conn.setFollowRedirects(true);
conn.setAllowUserInteraction(false);
conn.setRequestMethod("POST");

//byte[] authBytes = authStr.getBytes("UTF-8");
//String auth = com.sun.org.apache.xml.internal.security.utils.Base64.encode(authBytes);
// conn.setRequestProperty("Authorization", "Basic " + auth);

System.out.println("post data size:" + postData.length());

OutputStream out = conn.getOutputStream();
OutputStreamWriter writer = new OutputStreamWriter(out, "UTF-8");
writer.write(postData);
writer.close();
out.close();

System.out.println("connection status: " + conn.getResponseCode() +
"; connection response: " +
conn.getResponseMessage());

InputStream in = conn.getInputStream();
InputStreamReader iReader = new InputStreamReader(in);
BufferedReader bReader = new BufferedReader(iReader);

String line;
String response = "";
System.out.println("==================Service response: ================ ");
while ((line = bReader.readLine()) != null) {
System.out.println(line);
response += line;
}
iReader.close();
bReader.close();
in.close();
conn.disconnect();

return response;
}

Dept.java:

</pre>
package model; public class Dept { int DepartmentId; String DepartmentName; int LocationId; int ManagerId; public Dept(int DeptId, String DeptName, int LocId, int MgrId) { //super(); this.DepartmentId = DeptId; this.DepartmentName = DeptName; this.LocationId = LocId; this.ManagerId = MgrId; } public void setDepartmentId(int DepartmentId) { this.DepartmentId = DepartmentId; } public int getDepartmentId() { return DepartmentId; } public void setDepartmentName(String DepartmentName) { this.DepartmentName = DepartmentName; } public String getDepartmentName() { return DepartmentName; } public void setLocationId(int LocationId) { this.LocationId = LocationId; } public int getLocationId() { return LocationId; } public void setManagerId(int ManagerId) { this.ManagerId = ManagerId; } public int getManagerId() { return ManagerId; } } 

Your Excel in Design Time:

ADF-DI_4.PNG

Your Excel at run time:

ADF-DI_5


After Click on Ribbon button ‘Upload’, all the rows inserted to DB and also a web service is invoked at back end.

ADF-DI_6

Hope the post is Informative!

ADF Desktop Integration – showing table data in Excel workbook

This post explains how to to display table data in the Excel sheet using ADF Desktop Integration.

We’ll be discussing below items

  • Installing ADF- DI extension
  • Creating ADF Application
  • Working with Excel workbook

Installing ADF- DI extension:

Prerequisites: Before proceeding with ADF-DI extension installation first your system should have below soft wares installed, otherwise you end up getting an error when you try to install ADF-DI extension.

  • Microsoft .NET Framework 4
  • Microsoft Visual Studio 2010 Tools for Office Runtime
  • MS Office [I’ve used 2013 version]

Now go to JDeveloper -> ‘Tools’ -> Install ADF Desktop Integration.

Creating ADF Application:

  • Create Fusion Web Application (ADF). Application Name: ADFApp2, project names (keep default as model and viewcontroller)
  • Right click on Model project and create ‘Business Components from Tables’, crete DB connection and select ‘Departments’ table. Drag this table to right pane for updatableVO.
  • Right click on ViewController project and create JSPX page (dept.jspx)
  • Drag and drop the Deaprtments datacontrols from datacontrol section on to the dept.jspx page as table. (which will creates deptPagDef.xml file and along with tree binding in it)
  • Right click on viewcontroller project and create Microsoft Excel Workbook from client tier. (give Name: dept-DT)

6

7

8

Working with Excel workbook:

  • Double click on the excel file and it’ll prompt to select a page definition file from the available all page definition files in the project. Select view_deptPageDef file and click OK.

9

  • You can see a tree binding (DepartmentsView1) under Binidngs section of the Excel workbook.

10

  • Drag and drop the tree binding onto the cell and select ‘ADF Read-only Table’ -> OK.

11

  • It’ll open workbook properties window, there just click on OK. (we’ll configure it later)

12

  • Now you can see all the tree bindings in the Excel file.

13

  • in Jdev Right click on ViewController project -> project properties -> Java EE Application -> set ‘Java EE WebContext Root’ as ‘departments’ -> ok.

14

15

  • In excel work book click on worksheet properties and configure there to display data.

Worksheet properties -> Events […] -> Add -> StartUp -> ActionSet -> Actions […] -> Add button (Component Action) -> select Download -> OK -> OK -> OK.

16

17

18

19

20

21

  • In Jdev Right click on dept.jspx page and click on Run.
  • In excel workbook under oracle ADF menu tab, click on Run.

22

  • You can see the table data in the excel sheet as below. After review click on Stop and close the excel.

23

Hope You enjoyed the post!

In future will come up with more posts related to ADF-DI ‘update records in excel and upload to DB’ , ‘WebService Integration’ etc.

Disable few items in Select One Choice LOV in Oracle ADF

This post covers how to disable certain items in selectOneChoice LOV based on certain condition.

Existing code:

<af:selectOneChoice value="#{bindings.DepartmentId.inputValue}" 
label="#{bindings.DepartmentId.label}"
required="#{bindings.DepartmentId.hints.mandatory}"
shortDesc="#{bindings.DepartmentId.hints.tooltip}" id="soc1">
<f:selectItems value="#{bindings.DepartmentId.items}" id="si1"/>
</af:selectOneChoice>

Replace with:

<af:selectOneChoice value="#{bindings.DepartmentId.inputValue}" 
label="#{bindings.DepartmentId.label}"
required="#{bindings.DepartmentId.hints.mandatory}"
shortDesc="#{bindings.DepartmentId.hints.tooltip}" id="soc1">
<af:forEach items="#{bindings.DepartmentsView1.rangeSet}" var="list">
<af:selectItem label="#{list.DepartmentName}" id="si1" value="#{list.DepartmentId}"
disabled="#{list.DepartmentId eq 10 or list.DepartmentId eq 20 or list.DepartmentId eq 30}"/>
</af:forEach>
</af:selectOneChoice>


Reference:

How to make some LOV items non-selectable


Using Partial Triggers in Oracle Applications Cloud, Oracle Fusion Applications

This post explains how can we refresh a component when another component value is changed. You must be already aware that this can be achieved easily in ADF code by (a) setting the partial Triggers property of target component to the ID of source component & (b) setting the autoSubmit property of source component to ‘true‘.

But in Oracle Applications Cloud, Oracle Fusion Applications we won’t be having access to the source code and we need to implement it from the browser itself using customization feature.

partial triggers property is available for customization, but we need to find the ID of the source component which is not displayed anywhere to us. So to get the ID of the source component click on F12 (browser Inspect Element) then navigate to the source component and click on it. You can find the ID of that component over there.

What ever discussed above, let’s see step by step.

  • Login to Oracle Applications Cloud

1

  • You’ll be taken to the home page.

2

  • Select the sandbox if not selected any from the ‘Manage Sandboxes’ link (you can create a new sandbox also and its mandatory to select one sandbox before we proceed doing the customization to the application)

3

  • After selecting sandbox, click on ‘Set as Active’

4

  • Now navigate to the page where you wanted to do customization (eg: like in Order Management -> Orders on Hold page). Here let’s take a requirement that on selecting some value in ‘Hold Name’ LOV, the ‘Release comments’ component should display some custom message.

5

  • Now click on Inspect element (F12) and click on source attribute to find the ID of it. Copy the ID  [if source and destination components present inside same parent component then the last part if ID will be sufficient].

6

  • Click on Customize Pages link which you can get from user drop down.

7

  • Go to the Structure tab  and click on required component to customize

8

Note: If component is present inside a popup then click on button which brings the popup and in the component structure scroll down little where you can see multiple popups. Click on each popup and edit and read the ‘popup fetch listener’ property to understand why that popup is being used and check it is the correct one that we need to edit. After you find required popup if the content inside that is not visible, then set the ‘Content Delivery’ property from ‘lazyUncached’ to ‘Immediate’, then the content inside popup will be available to edit.

  • Click on source component -> If any popup comes select Edit -> Click Edit icon or right click on component at source code and click on Edit -> Set the ‘autoSubmit’ property to ‘true’

9

  • Click on Destination component and click on Edit and set the ‘partialTriggers’ to the ID which we copied earlier. [don’t set the entire path of ID, if source and destination components present inside same parent component then the last part if ID will be sufficient]. For the Value property set the EL logic as [#{bindings.HoldNameHeader.inputValue eq ‘CUSTOM HOLD’? ‘This is a custom Hold.’: bindings.HoldReleaseComments.inputValue] which means when ever ‘CUSTOM HOLD’ is selected in the LOV then below target component shows the message as ‘This is a custom Hold.’, and whenever other value is selected it won’t show any message and user can enter text over there. 

10

  • Now close the customization and you are ready to test. Select ‘CUSTOM HOLD’ from Hold Name LOV, then Release Comments shows the message as ‘This is a custom Hold‘. If you select other value then input text will be empty and editable. Now exit from the sandbox.

11

Hope you enjoyed the post 🙂


AM Service Interface (Expose ADF BC as web services/ service Enabled data objects SDOs)

======================================================
PART – 1:
AppModule Service Interface webservice genearation [Expose ADF BC as SDOs service enabled daat objects]:
-> create ADF application with business components (EO, VO, AM)
-> write two custom methods in AppModuleImpl class and expose those methods to Client Interface.
-> double click AM -> Service Interface tab -> you can see three sections ‘service Interface for custom methods’, ‘service interface for view instances’, ‘Genearated files for Service interface’.
-> select required methods/view Instances of datamodel in respective sections. When you select a view instance, operations for that view isntance are displayed jsut beside to it and we can select what operations to enable for the view instance [oeprations as ‘update’ to edit the record of that view instance, ‘Find’ to retrieve the records from that view instance, Create, Delete, Merge, GetByKey, Process, etc..].
-> After selection, under AM a folder named ‘service interface’ will be created which contains webservice artifacts [AppModuleService.java, AppModuleServiceImpl.java, AppModuleService.wsdl, AppModuleService.xsd]
-> Deployment: create deployment profile for ‘[Business Components Service Interface]’. deploy [check Model projetc is checked and under which both ‘common’, ‘middletier’ selected for integrated weblogic, and only ‘middletier’ selected for deployment on servers]
-> Test the webservices from Weblogic EM console like the same way you test SOA webservices.
======================================================
Sample custom methods which you can expose in AM:
public void updateSalary(Number employeeId, Number salary){
Key key = new Key(new Object[] {employeeId});
Row row = this.getEmployeesView1().getRow(key);
row.setAttribute(“Salary”, salary);

try{
this.getDBTransaction().commit();
}
catch(Exception ex){
ex.printStackTrace();
}
// The above methods accepts EmpId, Salary as input and updates the salary for the given EmpId in DB
======================================================
Note: we need Oracle web services manager to define the security policy for AppModule Webservices(according to documentation B31974-05 section 11.2.13). So need to license Oracle SOA suite cos webservices manager comes under SOA suite. So without using SOA, if you want to expose webservice from ADF business components you can not proivde security to them.
These exposed websrevices will creates new AM configuration and uses AppModule pool for DB connection when invoked.
======================================================
References:
http://andrejusb.blogspot.in/2009/08/web-service-interface-for-adf-bc.html

For secured WS you can check this post – http://andrejusb.blogspot.com/2012/11/adf-mobile-secured-web-service-access.html This is about ADF Mobile, but Web Service part is about secured AM Web Service
====================================================== ======================================================
====================================================== ======================================================
====================================================== ======================================================
PART – 2:
In above we have exposed the ADF Business component services as webservice (service enabled data objects/SDO).
Now we can consume those ADF BC services from SOA applicaiton or from another ADF application also.
Now we are discussing on How to consume remote ADF BC services[AM methods, VOs] which are exposed as webservice in other ADF applicaiton.

Create a new ADF applicaiton. [In this applicaiton we create Service Enable Entity Objects, whcih means EOs are created based on SDOs (service enabled objects)]
create Entity object-> when creating EO uncheck defalut datasource selection ‘DB schema object’, check ‘Service Interface’, give the WSDL URL and select the Service ViewInstance from dropdown.
Run the AM, now you can create a record, update record, delete record.
EO based on remote VO exposed though webservice (Service enabled EOs) will be similar to EO based on DB. But Joins doesn’t work for this EO when you create EO based on VO exposed as webservice.
We can declare Business Events on Service-Enabled Entity Objects, it works same as declared on normal Entity Object.
You can see the attributes but you can see the query, as this EO will get data dynamically as this is based on webservice.
So this is how you can crete a EO from a VO based on remote applicaiton which is exposed through webservice.
Deployment: Here first you need to add the ‘applnname_common.jar’ library of exposed applicaion to this consuming applicaiton.
Give the service connection information in connectons.xml. Now you can deploy and test from EM console.
Note: The operations which you select for a view isntance during exposing AM, those will only be available for applications when consuming them.
———————————–
References: http://andrejusb.blogspot.in/2009/08/service-enabled-entity-objects-in.html
====================================================== ======================================================
====================================================== ======================================================
====================================================== ======================================================
PART – 3:
Creating Business Event and subscribing to that event in Oralce SOA.
Busieness Events allows the loose coupling. Busieness Events can be created from ADF BC or from SOA.
These Business Events can be subscribed in SOA composite using Mediator.

References:
http://andrejusb.blogspot.in/2009/08/business-events-and-adf-business.html
http://biemond.blogspot.in/2008/05/events-in-adf-bc-and-handled-by-soa.html

————–

-> Oracle ADF Functional Patterns and Best Practices
http://www.oracle.com/technetwork/developer-tools/adf/index-100668.html

-> Customizing and Personalizing an Application
http://docs.oracle.com/cd/E18941_01/tutorials/jdtut_11r2_18/jdtut_11r2_18.html

-> Oracle Fusion Applications
12c: https://docs.oracle.com/applications/falcm12/OADEE/title.htm
11.1.8: https://docs.oracle.com/cd/E48434_01/fusionapps.1118/e15524/gs_gs_e.htm#CDEHADGG


ADF Customization

================== Customization: ========================

-> Oracle ADF allows us to create customizable web applications.
-> customizable applications means there will be one base application. On top of that application we develop multiple versions of application using multiple customizable layers and their contexts.
-> One customization layer can have multiple customization contexts (values)
-> At a time only one customizable layer value (context) will be applied on the base application (we can give one cust layer as default in properties file). Note that all the customization layers can be applied but only one context from each layer.
-> We select one customizable layer’s context from the ‘customization context window’ and we can work on the base application.
-> Similarly we can select another customizable layer’s context and work on the base application. Here you need to note that the customizations that you have done in one customizable layer’s context won’t appear in other customizable layer’s context.
Customization layers could be: ‘industry’. ‘site’Customization contrexts could be (need to input like below in proeprties file) industry=financial #industry=healthcare #site=remoteoffices site=headquarters So from the above settings if we run the application industry cust layer’s financial context will be applied on base appln along with site cust layer’s headquarters context.
How to do it? ‘Open Jdeveloepr with Default Role’
-> prerequisite: create one sample ADF web applicaiton.
-> 1) Create Customization Layers in ‘customizationLayerValues.xml’ file (which is present under <JDEVELOPER_HOME>/jdeveloper/jdev) This applies to all applications.If you want to aplly these customization layers to only this applicaiton then open adf-config.xml and udner the MDS tab, click on the link ‘Configure Design Time customizations’ which creates a file ‘customizationLayerValues.xml’ under ApplicaitonResources -> MDS DT  [Create cust layers as ‘site’, ‘industry’]
-> 2) Now define the Customization Contexts for each customization layer. So create a proeprties file ‘customization.proeprties’ under the modal project and give entries like below. industry=financial #industry=healthcare #site=remoteoffices site=headquarters

-> 3) Now create the customization class for each Customization Layer. [SiteCC, IndustryCC]. paste the belwo code into these class files. These classes will pick up the properties file and applies the customization layer’s context on the base applicaiton.
-> 4) Now defiene the created customization classes in adf-config.xml file under MDS tab.
-> 5) right click on viewContrller project -> ADF View -> check ‘Enable Seeded customizations’.
-> 6) Now work on Taskflows and UI. #So far we discussed about base applicaiton. #Now we disucss how to customize this base appln.
-> 7) Close Jdev and Reopen with ‘Fusion  apps developer Role/ Fusion apps Admstr Customization Role’ to start customization.
-> 8) First open with ‘Fusion  apps developer Role’ and create a ‘Fusion Apps customization application’. Name: XxCustomizationDemoApplicationpackage prefix: com.oracleDeployed EAR: baseAppln.earNext  -> Project Name: XxCustomizationDemoProject -> FinishThe created application contains Project ‘XxCustomizationDemoProject’ and folders under it are ‘Appln sources’,’Resources’,’Web content’.The base applicaton war files are available under ‘Application Resources ->  customizable Archive -> Base Appln Archive’.
-> 9) Now close and Reopen jdev with ‘Fusion apps Admstr Customization Role’.Now select the customization layer and its context. These latyers and their contexts are defined in the base application.For Fusion SCM we have the below cust layers.Global -> value/context: GlobalSite -> value/context: Site
-> 10) Under Application Resources -> customizable Archive -> Base Appln Archive ->  Right click and Filter.search for the jspff page/ taskflow (that should present in base applicaiton).Now under  ‘Base Appln Archive’ you can see only filtered files. Right click on that file and click on ‘customize’ option.It’ll promt to Add library. click on Add Library. When you do this under the project a folder ‘ADF Library Customizations’ will be created. And under this folder you see the page/taskflow which you selected to customize. [Note: the page/taskflow will be maintained its full path as in base applicaiton under the ‘ADF Library Customizations’ folder]-> Now you can customize the jsff page. [its not editable and only properties can be modified from property inspector]when you customize any component, under the project a folder ‘ADF Library Customization Sources’ will be created. Under this folder you can see the page which you customized with XML extension (eg: Invoicecreate.jsff.xml) The original full path of the page wil be maintained and under that path again few folders will be created (mdssys -> cust -> Global/Site (cust layer) -> GLOBAL/SITE (cust context) -> Invoicecreate.jsff.xmlFor any New component (jsff page, taskflow, VO etc) you need to switch to ‘Fusion  apps developer Role’.
cont…
=================================================

-> Let’s take an example. Create a base application with ‘EmplApp’ and create business comopnents (EmployeeEO, DeptEO, LocationEO, EmployeeVO, AM). -> Now create a view (employees.jsf) and display the Employee details like a form.So far we have developed the base application.

-> Now suppose our requirement is one customizable layer (LocationLayer) we want to show employee details as table with attributes only related to location.->  Now suppose our requirement is one customizable layer (DepartmentLayer) we want to show employee details as table with attributes only related to department.
-> To fulfill above requirement first we need to close jdev. And reopen with customization role.

-> Now right click on viewcontroller project and select ADF View -> Enable Seeded customizations.

-> Give entries of the requried customization layers in the customizationLayerValues.xml file (which is present under <JDEVELOPER_HOME>/jdeveloper/jdev) This applies to all applications. If you want to aplly these customization layers to only this applicaiton then open adf-config.xml and udner the MDS tab, click on the link ‘Configure Design Time customizations’ which creates a file ‘customizationLayerValues.xml’ under ApplicaitonResources -> MDS DT

-> Now we created customization layers, so we need to define them in the proeprties file. create a properties file in the Modal project ‘customization.proeprties’.  In the properties file define the different contexts to a single cutomization layer.

=====================================


Bounded Task flow ‘Transaction’ & ‘Share DC’ properties

-> Data Control scope [Shared/Isolated] & Transaction Options:
If bounded taskflow Overview -> behavior -> check box ‘shared data controls with calling Tf’ is Not checked means that this taskflow get its own data control frame. means having Isolated data controls.
If the property is checked means BTF uses the parent page(calling page) datacontrol frame instead creatig a new one.

Refer- Share data controls behavior [same data to be displayed on base page and region present it]:

JDeveloper & ADF: Carefully Select the Data Control Scope of Bounded Task Flows

Refer- (Transaction optios& datacontrol scope options): http://www.oracle.com/technetwork/developer-tools/adf/learnmore/adf-task-flow-trans-fund-v1-0-1723395.pdf?bcsi_scan_510c2960d4f4e50e=5IfxgIvC5gAAdZN467HNcuezvLAFAAAA7KQgLA==&bcsi_scan_filename=adf-task-flow-trans-fund-v1-0-1723395.pdf

Eg: Let’s take a basepage and display departments as readonly table. Keep two buttons to call two different bounded taskflows. for BTF1 keep the datacontrols scope proeprty to ‘shared’. So when you navigatte from basepage to BTF1 on click of button1 then the row selection in basePage will be maintained here also. Now chagne row and navigate back to basePage, again the row selection is mainainted. This is because by keeping the option to ‘shared’ will use the same datacontrol instance/frame.
Now for BTF2 keep the datacontrol proeprty to ‘isolated’ and call this BTF2 on click on button2 from base page. when you naviagate from basePage to BTF2 row selection is not maintained. Now chagne row and naviagate back to the basePagea again you can see row selection in basePage is different from selected row in BTF2. Beacause we set the datacontrol option to Isolated, it creaetd two different datacontrol instances for basepage and BTF2. [BTF2 is not using the basepage instance]
Note: 1)In above example the transaction property is left default which is “<No Controller Transaction>”
2) You can have N number BTF calling chain having datacontrol option as isolated/shared for each.
eg: UnboundedTF -> BTF1(shared) -> BTF2(isolated) -> BTF3(isolated) -> BTF4(shared)
In the above flow BTF1 uses the UTF’s datacontrol instacne (for matching datacontrols metadata)
BTF2 creates its new datacontrol instacne.
BTF3 creates its new datacontrol instacne.
BTF4 uses the BTF3’s datacontrol instacne (for matching datacontrols metadata)
3) if base page has Employee table and it is calling a BTF whose data control property is ‘shared’ and which has a page showing Departments table. Here though you set datacontrol property to ‘shared’ for BTF, as there are no datacontrol in BTF which present in basePage, a new datacontrol instance/frame will be created for the BTF.
We need to undertand from here is that datacontrol can be shared only if the metadata of datacontrol is same in current page and calling BTF. datacontrols meta data is present in page definition files.
4) (Not sure, mostly correct) Now let’s take another example, base page showing employees table and it is calling a BTF whose datacontrols property is set to ‘shared’ and which is having a page showing ‘Employees table’ and ‘departments’ table and ‘Jobs’ table. Now in this case only employees datacontrols are sahred and when you navigate from base page to BTF you can see the row selection will be maintained. but for deaprtments, jobs datacontrols it creates a new datacontrolFrame/ datacontrol instance as the department datacontrol, jobs datacontrol metadata is not present in parent page. the created dataControlFrame has datacontrols of departments, jobs only. Employees datacontrol will be taken from the existing dataControlFrame

5) So far we discussed about this property (Share data control with calling TF) behavior when navigating from one UBT/BTF to other BTF.
But this can also be used when you have differnt BTFs and they are present in a page as regions. If you set ‘shared data control with calling TF’ property to both the TFs present in the page then, selecting in one TFs table/row will be also change the current row in otehr TF if both have common data controls.

->
Transaction Options:
bounded taskflow Overview -> behavior -> Transaction drop down
‘No Controller Transaction’
‘Always Begin New Transaction’
‘Always Use the Existing Transaction’
‘Use the Existing Transaction If Possible’

Note: 1) Is transaction is open/Not for a datacontrol frame will be known to the framework by using method ‘ DataControlFrame.getOpenTransactionName()’
2) DataControlFrame also contains commit(), rollback() methods. Note that these are not the data control’s associated commit and rollback operations. DataControlFrame contains many datacontrols and the commit/rollbak methods in it applies to all the datacontrols in it.


Always Begin New Transaction:
Transaction (Always Begin New Transaction) + Datacontrol Scope (Isolated) => Valid
Transaction (Always Begin New Transaction) + Datacontrol Scope (Shared ) => throw error “ADFC-00020 + Task flow ‘<name>’ requires a new transaction, but a transaction is already open on the frame” at runtime.

If this option is set then, TF must call a Taskflow Return activity with ‘End Transaction’ property to ‘Commit/Rollback’ options.

Always Use the Existing Transaction:
Transaction (Always Use Existing Transaction) + Datacontrol Scope (Shared) => Valid
Transaction (Always Use Existing Transaction) + Datacontrol Scope (Isolated) => throw error “ADFC-00006: Existing
transaction is required when calling task flow <task flow name>” at runtime.

If this option is set then, TF SHOULD NOT call a Taskflow Return activity with End Transaction property to ‘Commit/Rollback’ options. If you do so, at design time only the return activity will be flagged as error and agt run time they’ll be ignored. You can set the return activity ‘End Transaction’ property to ‘None’.

Use the Existing Transaction If Possible: [If you are not sure about parent transaction, choose this option]
Transaction (Use Existing Transaction if Possible) + Datacontrol Scope (Isolated) == Transaction (Always Begin New Transaction) + Datacontrol Scope (Isolated)
Transaction (Use Existing Transaction if Possible) + Datacontrol Scope (Shared) (If datacontrol frame of parent has Open the transaction) then == Always Use Existing Transaction + Shared
Transaction (Use Existing Transaction if Possible) + Datacontrol Scope (Shared) (If datacontrol frame of parent has not Not Open the transaction) then == Always Begin New Transaction + Shared

Let’s see an example (here arrow (->) means navigaiton (calling))
UTF -> BTF1 (TXN-exisitng) -> BTF2 (TXN-New) -> BTF3 (TXN-New) -> BTF4 (TXN-exisitng)

BTF1: it uses exisitng transaction. uses same AM instance of UTF. [I assume dataControl proeprty is shared]
BTF2: it begins new transaction. new AM isntance created. so it must call taskflow return with End transaction prperty as Commit/Rollback [I assume dataControl proeprty is Isolated]
BTF3: it begins new transaction. new AM isntance created. so it must call taskflow return with End transaction prperty as Commit/Rollback [I assume dataControl proeprty is Isolated]
BTF4: it uses exisitng transaction of UTF. Here you can not set ‘End Transaction’ property of taskflow return activity to commit/rollback. it should be default (none). Once control is returned to UTF then from there you can commit/rollback.
When you commit int UTF now, then data changed in UTF& BTF4 will get committed. (BTF2, BTF3 data has to be committed there itself).
If you do not set the Transaction property to the BTF then Transaction will not be started. And if perform any transaction events, then you get run time exception.
————————————–
-> <No Controller Transaction>: The called bounded task flow does not participate in any transaction management.
-> Always Use Existing Transaction: When called, the bounded task flow participates in an existing transaction already in progress.
-> Use Existing Transaction If Possible: When called, the bounded task flow either participates in an existing transaction if one exists, or starts a new transaction upon entry of the bounded task flow if one doesn’t exist.
-> Always Begin New Transaction: A new transaction starts when the bounded task flow is entered, regardless of whether or not a transaction is in progress. The new transaction completes when the bounded task flow exits.
————————————–
Programatically call a DataControl frame and commit one datacontrol in it.

BindingContext bc = BindingContext.getCurrent();
String dcfName = bindingContext.getCurrentDataControlFrame();
DataControlFrame dcf = bc.findDataControlFrame(dfcName);
dcf.commit(); // or dcf.rollback();
——————————————–

References:

Click to access adf-task-flow-trans-fund-v1-0-1723395.pdf


Task Flow Refresh property

Let us discuss about this property with real time examples:

Example 1:

-> Let’s take a requirement, there is a base page and it has two regions(BTFs). If you update data in one region, it should update the data in other region. [be clear that there is no navigation from one one region (BTF1) to other region (BTF2), so DC scope could be anything isolated or shared, that doesn’t matter as BTF2 will creates new datacontrol frame and won’t use BTF1s datacontrol frame as there is no navigation from BTF1 to BTF2. so setting DCScope for BTF2 to shared really doesn’t matter. You also note that BTF1, BTF2 are present inside base page(UTF) so if you set DCScope to shared for them, then they may use the exisitng datacontrol frame created by UTF for the common datacontrols present in BTFs and UTF. In this example assume data in base page and BTFs is different. But BTF1 and BTF2 displaying same data from DB]

-> On updating data and save it commits data to DB in BTF1, and then as BTF2 also displaying same data, it should be refreshed and show updated data. [if BTF1 is displayed first and then if it is calling BTF2 then by using DC Scope to ‘Shared’ you can get latest data from BTF1. but here requirement is to display BTF1 and BTF2 both in same page and there is no navigation from BTF1 to BTF2]

-> To do this, we have to use the ‘Refresh’ property available for the BTF bindings in the base page. Set the Refresh property for BTF2 binding to ‘If Needed’ in base page bindings.  So what it will do is, if there is any change in the input parameters value of BTF2, then it refreshes the entire BTF2 taskflow.

-> So lets create a dummy input parameter to BTF2 and let’s change its value every time we click on ‘save’ button in BTF1.  [TF parameters -> Name: refeshFlag, class: java.lang.String, Value: #{pageFlowScope.refreshFlag}] so what ever value we assign to parameter ‘refeshFlag’ it stores into the page flow scope and makes it available through out the taskflow.

-> So on click of ‘save’ button using property listener, store some unique value (current time) to a scope variable #{sessionScope.refreshFlag}. Now we need to assign this value to the TF input parameter ‘refeshFlag’ in the base page bindings. Which then internally stores into #{pageFlowScope.refreshFlag} and makes it available through out TF. Of course we do not want that value, we just created input parameter only because if we change the input parameter value along with refresh condition to ‘ifNeeded’, it’ll refreshes the taskflow.

-> Use sample code below to generate unique value (current time) on click on save button in BTF1 and assign to a scope variable #{sessionScope.refreshFlag}.

<af:button text=”save” actionListener=”#{bindings.Commit.execute}”><af:setPropertyListener type=”action” from=”#{backingBeanScope.RefreshHelperBean.refreshToken}”  to=”#{sessionScope.refreshFlag}” /></af:button>

Bean code:  

public class RefreshHelper{

public RefreshHelper(){

super();

}

public String getRefreshToken(){

return String.valueOf(System.currentTimeMillis())

}

}
-> Now so far with our code what will happen is on click on ‘save’ button in BTF1, the current time will be fetched from system (which will be alway unique) and wil be assigned to #{sessionScope.refreshFlag}. As this value ‘#{sessionScope.refreshFlag}’ is given as value for the input paramter ‘refeshFlag’ of BTF2, it will be assigned to the refreshFlag parameter which stores into #{pageFlowScope.refreshFlag} which we defined in BTF2. As the value is changed for the input paramter of BTF2, the BTF2 refreshes.

-> We achieved our requirement right? Not completely, our requirement is not only to refresh the region but along with that we want to fetch latest data from DB again. [note: just refresh will not fetch latest data from DB]. so fetch latest data from DB, we need put execute action method before the jsff fragment in BTF2 and make it as default activity.  So whenever the input parameter value for BTF2 changes, it refreshes the BTF2. so it executes the ‘execute’ method action every time it refreshes.   So we get the latest data from DB which will appear in the page.

5.png
Note: If you set refresh=”ifNeeded” for BTF2 and not set any input paramers, is same as refresh=”default”, means it doesn’t refresh BTF2 [The BTF2 will be refreshed only once when the base page is loaded.]
—————

Example 2:

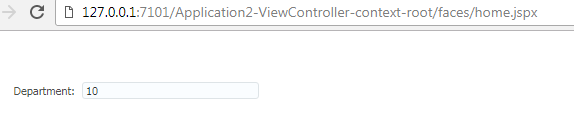
-> Now take another simple example so that you get more clear about this.There is a base page and it has a region (BTF). Base page displays departments table. On selecting a row in departments table should display the department name in the (BTF).
-> To implement above requirement first base page should contain the departments table ‘tree binginds’ along with ‘department id’ attribute binding [#{bindings.DepartmentId.inputValue}]. the BTF region should contain attr binding #{bindings.DepartmentName.inputValue}.
-> Now create an input parameter for BTF [TF parameters -> Name: deptFlag, class: java.lang.String, Value: #{pageFlowScope.deptFlag}]-> in the base page for BTF bindings set the Refresh proepty value to ‘ifNeeded’ and also set the input parameter  ‘deptFlag’ value to  #{bindings.DepartmentId.inputValue}.-> DCscope for BTF will be by default ‘shared’, so keep to shared/ default (do not set to isolated -means unchecking shared).

-> So when you click a row in the table, current for the table will be the selected row. As we have attr bindigns #{bindings.DepartmentId.inputValue} in the page, the value for that will be changed according to the current row. The same value we have assigned to the BTF input parameter ‘deptFlag’. So the input paramter deptFlag’s value will be updated. As we have refresh condition also set to ‘ifNeeded’ and input paramete value changed, the BTF will be refreshed.

-> BTF contains #{bindings.DepartmentName.inputValue} binding, which it tries to get it from the base page as the BTF DCScope is ‘shared’. As the currnet row changed in base page the value for #{bindings.DepartmentName.inputValue} will also be acoording to the current row, so the selcted row’s department name will be displayed in the BTF region.

-> the BTF input paramter value will be stored to #{pageFlowScope.deptFlag}, which we have not used to display anywhere in BTF. The input parameter here is only used for the purpose of BTF refresh. we are not dealing with its value anywhere.

-> If there are no rows in the table, then no value will be assigned to BTF input param, so it displyas value as null for #{bindings.DepartmentName.inputValue}.

Note: In the example we have added bindigns ‘#{bindings.DepartmentId.inputValue}’ to the base page. you can add any att binding of the table and assign to the input parameter of BTF, that doesn’t make any difference.
—————

References:

http://andrejusb.blogspot.in/2015/04/simple-effective-refresh-approach-for.html

Click to access 53-taskflow-in-popup-169196.pdf
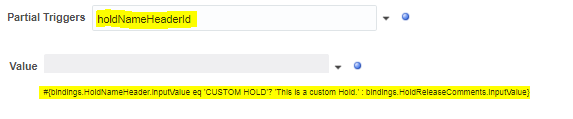
 

ADF Application Module (AM) properties and Performance Tuning:

Performance Tuning:
Programatically created AM Instances must be released after the usage.
ApplicationModule am = Configuration.createRootApplicationModule(amDefName, configName);
//logic
if(am!=null){
Configuration.releaseRootApplicationModule(am, true);
}

AM Properties:

  • The No of AMs that should be kept available during Noraml/ light use: jbo.ampool.minavailablesize
  • The No of AMs that should be kept available during High use: jbo.ampool.maxavailablesize
    [Recommended to keep it 20% more than Noraml usage value]
  • AM Pool clean up frequency is decided by: jbo.ampool.monitorsleepinterval (Default 600000ms or 10 minutes)
  • AM Pool Max inactive age of AM instancce: jbo.ampool.maxinactiveage (Default 600000ms or 10 minutes)
  • AM pool monitor removes all unused AM instances which have been living more than 1 hour: jbo.ampool.timetolive
    If the value set to -1 then removal of AM based on this property will be prevented.
  • property ‘jbo.ampool.maxinactiveage’ will remove the number of Inactive AM instances above the value of ‘jbo.ampool.minavailablesize’
    [if the ‘jbo.ampool.minavailablesize’ value is 10 & assume there are 25 current inactive AM instances, then only 15 inactive AM instances
    will be cleared by AM Pool Monitor]
  • property ‘jbo.ampool.timetolive’ if not set to -1, then it removes all the inactive AM instances (more than 1 hr) irrespective of the
    proeprty ‘jbo.ampool.minavailablesize’

FetchSize: Decides No of records read from DB in one round trip.
Recommended The value of FetchSize should be = Range Size of Interator(defined in page definition) + 3
The Max value of Fetchsize = Max value of Iterator size.
For UI bound View Objects keep fetchsize less than 30.

Maximum FetchSize:  Total no of records that a VO can retrieve from DB.
RangeSize: Decides no of records read into middle tier for a single data access.
——————————-
Popup: [use property contentDelivery=”lazyUncached” in a case that when you open popup enterred values,
click on cancel and reopen popup. Generally the previously entered values will be shown though not submitted.
To get fields cleared every time click on cancel button use proeprty  contentDelivery=”lazyUncached” for a popup].
Every time you raise the popup, lazyUncached will be in place an the data will be fetched from the DB.
——————————-
When you Access a page from browser:
Server recieves the request, Request is intercepted by ADF BindingFilter and Initialses BindingContext
[which is runtime represenation of DataBindings.cpx]