In this post I’d like to show you a sample application which continuously reads the data from CSV files (or text file with csv format) with a specified name pattern from a specified location and writes to a csv file in the specified location using File Adapters in Oracle SOA.
- Let’s start creating a SOA applicaiton. Give the application name as ‘FileAdapterApp’ and give the project name as ‘FileAdapterProj’ and then select BPEL Process.
- Give the name for BPEL as ‘FileAdapter_BPELProcess’ and select template as No Service

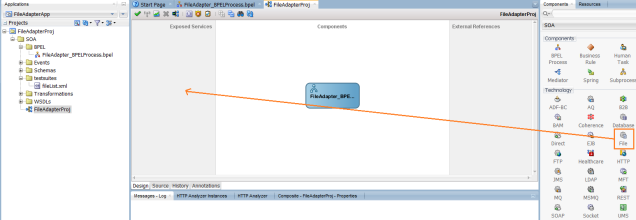
- Drag and drop the File adapter like shown in picture
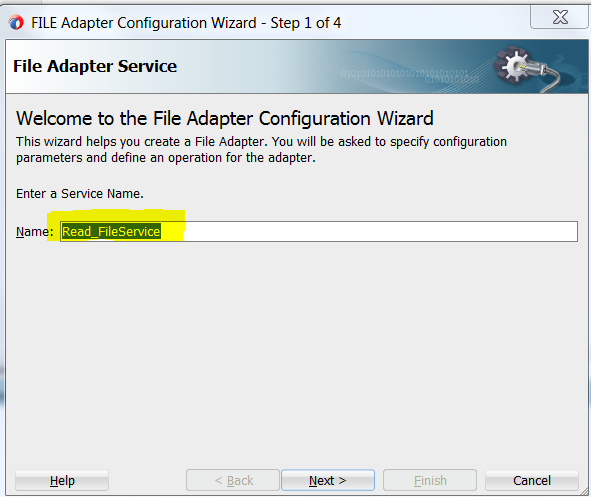
- Give the name as ”Read_FileService’
- Let the default selection be ‘Define from operation and schema (specified later)
- Let the default File Server JNDI name as ‘eis/FileAdapter’
- Selection Operation as ‘Read’ leave other fields as default
- Give the directory path of the files from where SOA system will read the data from

- Give the file name pattern, so that SOAsystem will only read the data from files whose file name matches with the specified pattern.

- Let the parameters as default for File polling [Polling frequency 1 means for every one minute SOA system will check are there any new files to read in the specified directory]
- In the Messages step click on gear icon to create a new schema for the file pattern which SOA system supposed to read.

- Click Next in welcome format builder step, Let the file name as default ‘nxsd_schema1.xsd’ in File Name and directory step, Choose Type as ‘Delimited’.
- Browse the sample file name so that SOA system understands the data type of file which it reads and so that it can generate xsd file accordingly.

- Let the default options be checked in Record Organization step.
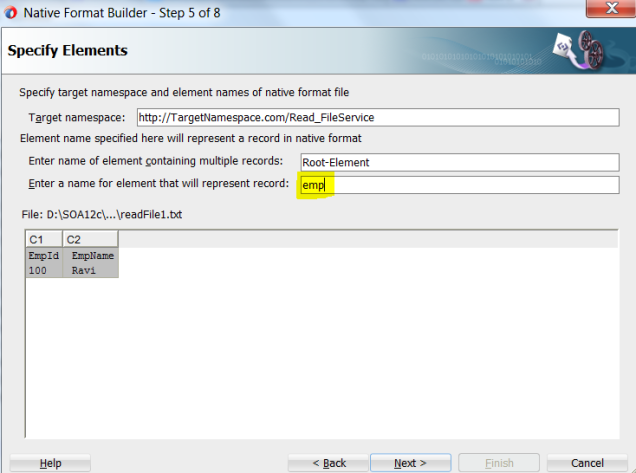
- In the ‘Specify elements’ step give name for the element that will represent record as ’emp’
- Let the default options be checked in Specify Delimiters and click on Next.
- In the Fields properties Check ‘Use the first record as the fields names’
- Click Next in Messages step and click on Finish.
- Drag and drop the File adapter again and give the name as ‘write_FileReference’ and click on Next.

- Let the default selection be ‘Define from operation and schema (specified later)
- Let the default File Server JNDI name as ‘eis/FileAdapter’
- Selection Operation as ‘Write’ and leave other fileds as default
- Give the directory path of the files from where SOA system will Write the data to
- Give the file Naming convention as ‘write%SEQ%.txt’, so that soa system will write the data to files and name it with the specified pattern.

- In the Messages step click on gear icon to create a new schema for the file pattern which SOA system supposed to read.
- Click Next in welcome format builder step, Let the file name as default ‘nxsd_schema2.xsd’ in File Name and directory step, Choose Type as ‘Delimited’.
- Browse the sample file name so that SOA system understands the data type of file which it has to write like and so that it can generate xsd file accordingly.
- Let the default options be checked in Record Organization step.
- In the ‘Specify elements’ step give name for the element that will represent record as ’empl’
- Let the default options be checked in Specify Delimiters and click on Next.
- In the Fields properties Check ‘Use the first record as the fields names’
- Click Next in Messages step and click on Finish.
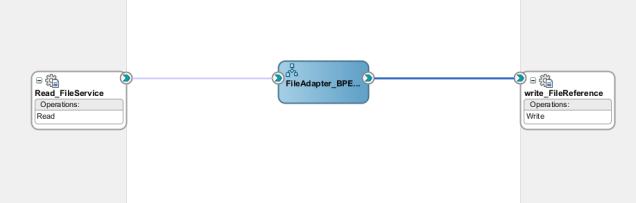
- Connect the File Adapters to the BPEL Service. While connecting File Read adapter if you get any popup leave the fields with default values and clock OK.
- Now double click on BPEL in the composite, it’ll open the BPEL process.
- Drag and drop the Recieve activity on to the Drop activity Here section of BPEL.

- Now your BPEL looks like below.

- Connect receive activity to Read_FileService, a pop up opens in which click on ‘+’ symbol to create a variable, let the name be as default and click OK. Then Apply and OK.
- As we know to invoke any adapter service we should use Invoke activity, so drag and drop Invoke activity just below the Receive activity.

- Connect the Invoke activity to the write_FileReference adapter, which opens a popup, click on ‘+’ symbol and let the name be default one and click OK and then Apply and again OK.
- Now drag and drop the Assign activity just below the Receive activity and above Invoke activity.

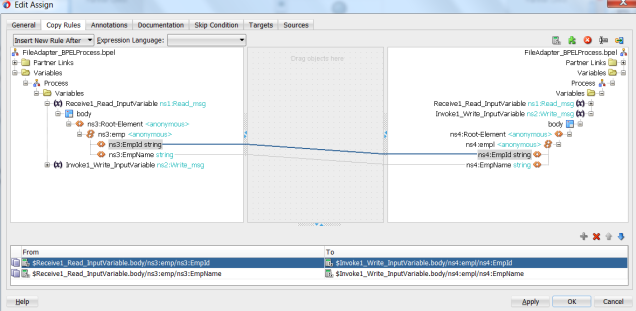
- Double click on Assign activity which opens a popup where map the variables of Receive activity to the variables of Invoke activity. Apply and OK.
Deployment:
Right click on project and then Deploy -> Project name -> Deploy to application server -> Check Overwrite any existing composites with the same revision ID -> select Integrted weblogic server -> Select ‘DefaultServer’ -> Next and Finish
Note: While deploying if you get any ‘There is no start activity error’ then double click on receive activity and select ‘Create Instance’ checkbox. Try to deploy again.
To test Composite is Active: Open ’em console’ go to SOA -> soa- infra(Default Server) -> Deployed Composites Tab -> There you can see the deployed composite with name ‘FileAdapterProj[1.0]’ and check the status as Active.
Composite Testing:
Place a file with name read*.txt (eg: read1.txt) and with some sample data in it, in a read location which we mentioned while configuring File adapter for read operation.
For every minute SOA system will poll at this location and soon it finds the read file it reads the file and deletes it and then creates a new write file with name write%SEQ%.txt (eg: write1.txt) with the data which it fetches from the read file and places in the location which we mentioned during File adapter configuration for write operation.

Hope you like the post. Do Follow the blog for more updates 🙂
